Everything You Need to Know About Ledger.com/start
When you step into the world of cryptocurrency, one of the first things you'll learn is the importance of securing your digital assets. This is where hardware wallets, like those provided by Ledger, become an essential tool. Ledger is one of the leading names in cryptocurrency security, and their hardware wallets are widely respected for offering a secure and reliable way to store your private keys offline.
If you're interested in setting up a Ledger hardware wallet, one of the most crucial steps is to start at Ledger.com/start. This is the official starting point where users can begin the setup process and gain access to Ledger's suite of products. In this article, we’ll walk you through everything you need to know about Ledger.com/start, including its purpose, how to set up your wallet, and some best practices to ensure the safety of your assets.
What Is Ledger.com/start?
Ledger.com/start is the official web portal provided by Ledger, the company behind the widely known Ledger Nano S and Ledger Nano X hardware wallets. This platform is where you begin the process of setting up your Ledger wallet, whether you’re a new user or looking to manage an existing wallet.
Ledger wallets are designed to store your private keys, which are the cryptographic keys that allow you to access your cryptocurrency holdings. Instead of keeping these keys online, where they’re vulnerable to hacking or theft, Ledger wallets store them offline, making it far more difficult for malicious actors to gain access to your assets.
When you go to Ledger.com/start, you are greeted with easy-to-follow instructions that guide you through the setup process for a new Ledger hardware wallet. The platform is designed to be user-friendly, ensuring that both beginners and experienced users can get their wallets up and running quickly.
Getting Started with Ledger: What You’ll Need
Before diving into the setup process, make sure you have the necessary items:
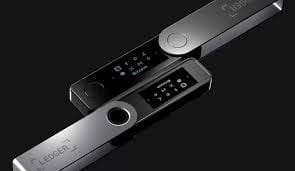
- A Ledger Hardware Wallet: You’ll need either a Ledger Nano S or Ledger Nano X, depending on your needs. The Nano S is a more basic, budget-friendly option, while the Nano X offers Bluetooth functionality and can store more assets.
- A Computer or Smartphone: You’ll need a device to connect your Ledger wallet to, either through a USB connection (for the Nano S) or Bluetooth (for the Nano X). You can use a computer, tablet, or smartphone depending on your preferences.
- Ledger Live: This is the companion software that you’ll need to manage your wallet. Ledger Live is available for both desktop and mobile devices, and you can download it from Ledger.com/start as part of the setup process.
- Your Recovery Seed: This is one of the most important parts of the setup process. When you set up your Ledger wallet, you’ll be given a 24-word recovery seed. This seed is a backup of your private keys, and it’s critical for recovering your wallet if it is ever lost, stolen, or damaged. Keep it secure and never share it with anyone.
How to Set Up Your Ledger Wallet
Step 1: Visit Ledger.com/start
The first step is to go to Ledger.com/start. This is the official website where you’ll begin the process of setting up your Ledger wallet. The site provides direct links to download Ledger Live, the software you’ll need to manage your wallet.
Step 2: Download Ledger Live
Once on the website, download Ledger Live for your device. This is the primary tool used for interacting with your Ledger hardware wallet. It’s where you can manage your cryptocurrencies, check balances, send and receive transactions, and more. Make sure to only download Ledger Live from the official Ledger website to avoid any potential security issues.
Step 3: Initialize Your Ledger Wallet
After installing Ledger Live, open the application and connect your Ledger device to your computer or smartphone. You’ll be prompted to initialize your device. This process includes setting a PIN code for added security and generating your 24-word recovery phrase.
This recovery phrase is essential for wallet recovery. Write it down on paper and store it somewhere secure — preferably offline. Do not store it on your computer or online, as this can compromise your wallet’s security.
Step 4: Set Up Your Cryptocurrency Accounts
Once your Ledger wallet is initialized, you can start setting up cryptocurrency accounts. In Ledger Live, you can add accounts for a variety of cryptocurrencies, including Bitcoin, Ethereum, and many others. Each cryptocurrency account will generate an address for receiving funds.
Step 5: Backup Your Recovery Phrase
As mentioned earlier, during the setup, you’ll be provided with a 24-word recovery phrase. This is a critical step, as this recovery phrase is the only way to recover your wallet if you lose or damage your Ledger device. Write it down and store it in a secure location, such as a fireproof safe, to ensure it is not lost or stolen.
Security Tips for Using Ledger Wallets
While Ledger hardware wallets are incredibly secure, there are still best practices you should follow to ensure your assets are protected:
1. Never Share Your Recovery Seed
Your recovery seed is the most important piece of information you’ll have when it comes to accessing your wallet. Never share it with anyone, not even Ledger customer support. If someone gains access to your recovery phrase, they can steal all the assets in your wallet.
2. Use Strong PINs
When setting up your Ledger wallet, make sure to choose a strong PIN. A strong PIN should be unique and difficult to guess. Avoid using simple numbers like “1234” or “0000” that can be easily cracked.
3. Enable Two-Factor Authentication (2FA)
While Ledger wallets themselves are highly secure, it’s a good idea to enable two-factor authentication (2FA) on any associated accounts, such as exchange accounts or other services related to cryptocurrency. This adds an extra layer of protection to your assets.
4. Stay Phishing-Free
Be aware of phishing attempts. Never click on links from unsolicited emails or messages, and always double-check URLs to make sure you are on the official Ledger.com website.
5. Regularly Update Firmware
Ledger regularly releases firmware updates to improve security and add new features. Make sure to regularly check for and install any updates using Ledger Live. These updates are essential for maintaining the security of your wallet.
Conclusion
Ledger.com/start is your gateway to securing your cryptocurrency assets with a Ledger hardware wallet. By following the straightforward setup process and adhering to security best practices, you can ensure that your private keys remain safe from hackers and other threats. Remember to back up your recovery phrase securely and never share it with anyone.
As the cryptocurrency landscape continues to evolve, using a reliable and secure hardware wallet like Ledger’s is one of the best ways to protect your digital assets for the long term. Whether you're just starting out or have been in the crypto world for a while, Ledger.com/start is the place to begin your journey toward securing your financial future.