Getting Started with Ledger: A Comprehensive Guide
If you're new to cryptocurrency or looking to step up your security, one of the best decisions you can make is investing in a hardware wallet. Among the many options available, Ledger is one of the most reputable names in the space. This guide will walk you through getting started with your Ledger device, from setup to best practices for securing your crypto assets.
What Is Ledger?
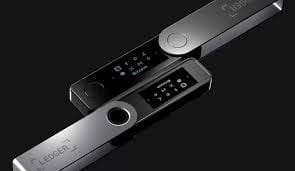
Ledger is a company that specializes in cryptocurrency hardware wallets. These devices are designed to keep your crypto private keys offline, making them less susceptible to hacking compared to software wallets or exchanges that store keys online. With its flagship products, Ledger Nano S and Ledger Nano X, Ledger provides a secure and user-friendly way to store your cryptocurrency, including Bitcoin, Ethereum, and many others.
Unlike traditional wallets, Ledger devices keep your private keys in a secure, isolated environment, known as a secure element, which means even if your computer or mobile phone gets compromised, your funds remain safe.
The First Step: Purchasing Your Ledger Wallet
Before getting started, the first step is purchasing your Ledger device. You can easily do this by visiting the official website, Ledger.com/start. It's crucial to buy your hardware wallet directly from the official Ledger website or an authorized retailer. This ensures that the device has not been tampered with, which could put your assets at risk.
Once you've received your Ledger wallet, you'll be ready to begin the setup process.
Setting Up Your Ledger Wallet
Setting up your Ledger device is a simple process, but it’s important to follow each step carefully. Here’s how to get started:
- Unbox and Connect: Begin by unboxing your Ledger device. You'll typically find the hardware wallet, a USB cable, and a recovery sheet in the box. Plug the device into your computer or mobile phone using the provided cable.
- Install Ledger Live: The next step is to download and install the Ledger Live app, which is the official software used to manage your Ledger device. You can find it on the Ledger website or in your app store if you're using a mobile device. Ledger Live is available for Windows, macOS, Linux, iOS, and Android, making it compatible with most devices.
- Initialize Your Device: Once you've installed Ledger Live, launch the app and follow the on-screen instructions to initialize your device. You’ll be asked to choose a PIN code, which is essential for securing your wallet. Make sure to choose a PIN that is unique and difficult for anyone else to guess.
- Create a Recovery Phrase: One of the most critical steps in setting up your Ledger wallet is creating your recovery phrase. This is a list of 24 words that will allow you to restore access to your wallet if the device is lost, stolen, or damaged. Write these words down on the provided recovery sheet, and store it in a safe place, separate from your wallet. Never share this phrase with anyone or store it online. If someone gains access to your recovery phrase, they can steal your crypto.
- Install Apps for Cryptocurrencies: With your Ledger device set up, you can now install cryptocurrency apps for the assets you plan to store. For example, if you’re storing Bitcoin, Ethereum, or Litecoin, you’ll need to install the corresponding apps through Ledger Live. This allows your Ledger wallet to interact with your chosen cryptocurrencies securely.
Using Your Ledger Wallet
Once your wallet is set up and the apps are installed, you’re ready to start using your Ledger device to manage your crypto assets.
- Send and Receive Cryptocurrency: To send or receive cryptocurrency, open the Ledger Live app and choose the relevant cryptocurrency account. If you want to receive funds, simply click “Receive,” and you’ll see your Ledger wallet’s address. You can then share this address with others to receive crypto. If you want to send funds, select “Send” and follow the prompts.
- Confirm Transactions on the Device: Ledger devices provide an extra layer of security by requiring you to physically confirm transactions on the device itself. This means that even if someone gains access to your Ledger Live app, they cannot send funds without your physical confirmation.
- Backup and Restore: Always keep a backup of your recovery phrase in case your device is lost or damaged. You can restore your wallet to a new Ledger device or even a compatible software wallet by entering the recovery phrase.
Best Practices for Securely Storing Cryptocurrency
While Ledger devices provide robust security, it’s important to follow best practices to protect your crypto assets further. Here are a few tips:
- Store your recovery phrase securely: The most common way to lose access to your cryptocurrency is by losing the recovery phrase. Store it in a safe, private location, such as a fireproof safe or a secure bank deposit box.
- Update your device regularly: Ledger releases firmware updates to improve security and performance. Make sure to regularly check for updates through the Ledger Live app.
- Avoid phishing attempts: Never share your private keys or recovery phrase with anyone. Be wary of emails or websites that ask for this information. Legitimate companies, including Ledger, will never ask you for your private keys.
Conclusion
Getting started with Ledger is straightforward, and it’s one of the most reliable ways to secure your cryptocurrency. Whether you’re a beginner or a seasoned crypto user, Ledger’s hardware wallets offer an unparalleled level of security for your assets. By following the steps outlined above and practicing good security habits, you can ensure your cryptocurrencies remain safe from theft and hacks. Visit Ledger.com/start today to begin your journey into secure crypto storage.